Use the percentage to compare attempts
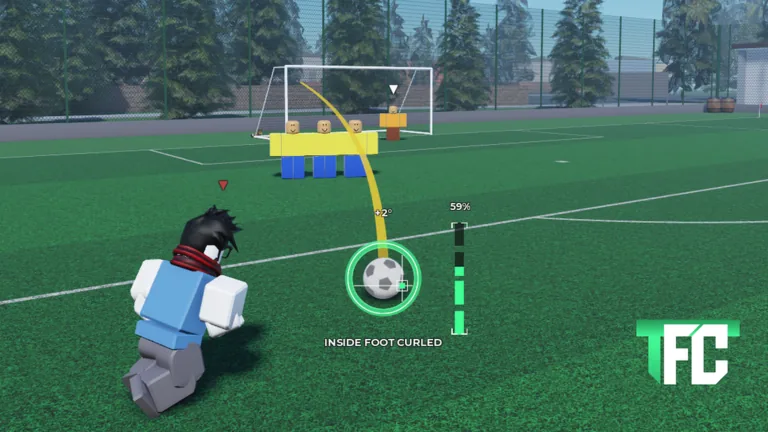
The vertical percentage display beside the ball is the most useful starting point for understanding the That Freekick Challenge power meter. An official Roblox image shows 59% next to an INSIDE FOOT CURLED shot. That number is an example state in a particular setup, not a proven best setting for every free kick. Your goal is to use the display to make one attempt comparable with the next.
If a ball does not reach the part of the goal you selected, power is one variable worth testing. If the ball hits a wall directly in front of it, changing power first will not solve an aim line that still crosses the defender. Diagnose the path before adjusting the meter.
Run a fair power test
Keep the ball position, wall arrangement, target, shot type, and displayed angle as steady as you can. Take one baseline shot and remember the meter reading. For the next shot, choose a modestly different reading and watch what changes. The point is not to discover a universal percentage in two tries; it is to see whether more or less displayed power moves the ball closer to your intended result in that specific arrangement.
| Outcome | Ask before changing power |
|---|---|
| Wall block | Is the planned trajectory already inside the wall? |
| Wide miss | Did the aim end outside the posts? |
| High miss | Would a lower meter value be a clean next test? |
| Keeper save | Is a different target lane more useful than added force? |
| Short or weak shot | Would a higher value be a clean next test from the same setup? |
These questions prevent the meter from becoming a catch-all explanation. A shot involves a route, target, wall, goalkeeper, and sometimes added obstacles. The percentage is only one part of that picture.
Record what worked, not just what scored
Suppose a first shot hits the wall and a second clears it after you move the route. That improvement came from the route change, even if the power display stayed the same. Suppose a third shot reaches the goal area but goes high after a power change. That gives you a better comparison than the first wall block did. Write down the key difference in one sentence: “same angle, lower power, cleared wall,” or “same path, higher power, too high.”
A public TFC duel features players calling out several power values under a countdown. Their guesses are entertaining, but the footage does not establish a fixed winning percentage. Your own repeatable attempts in the current game are a better guide for the setup you are actually using.
For quick practice, make three shots from one arrangement: baseline, lower meter, higher meter. Return to the best result and refine the target or angle. If the wall or ball position changes, start a new comparison rather than carrying over a number without context.
Bring a baseline into a challenge
Timed turns reward familiarity. If you know what a certain displayed setting did from a similar location, you can begin there, then make one correction after the first outcome. Do not spend the entire turn searching for a percentage that someone else used in a different screenshot. Read the current wall and goal first; the meter supports your plan.
FAQ
Is 59% the best power in TFC?
No universal best value is established. It is simply the reading visible in an official image of one setup.
Should I raise power after every miss?
No. A wall block, wide aim, high shot, and goalkeeper save call for different tests.
How many shots should I use for a comparison?
Two or three from the same arrangement can show whether a controlled change helps. Repeat a promising result before trusting it.
Does the meter replace aiming?
No. The planned route still needs to clear the wall and reach a useful part of the goal.